
The long-awaited Version 3.5 update to my Mio C230 Unlock includes many refinements since Version 3.4 was released. Thanks go out to all who’ve contributed to this release, even if I unintentionally forgot to give credit to you.
-
An variety of additional Games screens to accommodate 5 additional games included in this release (thanks to Mike and the individual that put the download packages together!), as well as more of your own. So as to not bloat the Flash Disk with the additional games, install them in the Games folder in the root of your Storage Card.
-
A “Screen Choices” menu that has been further refined to allow you to select a theme that will be applied to the main desktop screen, the Extra Tools screen and the Games screen in unison.
-
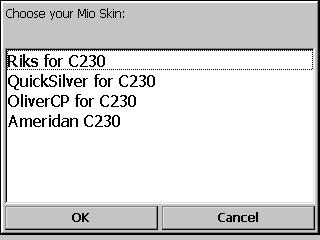
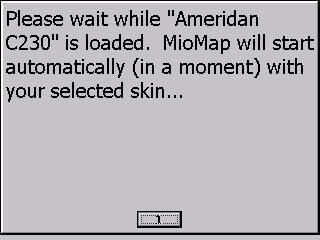
A “Skins Choices” menu (thanx Mike FFI) to manage your favorite skins saved on your SD card and be able to choose them on the fly to further personalize your C230!
-
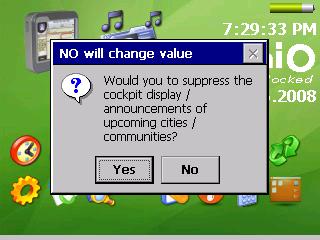
A “Settings Choices” menu that now allows you to choose the menu text font size and suppress upcoming cities and communities in the navigation bar in addition to the flyover options previously offered, again, on the fly as the needs change.
-
The latest version of Ameridan’s (me) skin (an enhanced Mio skin) and CD’s (C. Dean) Quicksilver ’66 skin, both adapted exclusively for the Mio C230. These will be installed in the Skins folder of your SD card. You can add your own additional favorites to this folder as well.
-
A set of document viewers so that you’ll be able to peruse just about any common document type out there. The set includes: a PDF document viewer , another Image viewer, a Powerpoint presentation viewer, an Excel document viewer and a Word document viewer.
Please note that this release does not apply to those using my Version 3.3 LITE. That release will be published seperately.
From either desktop screen, you’ll be able to access the ”Extra Tools” screen, the new “Games” screen or your chosen clock screen. You might also choose a clock or desktop default screen and never access the others. All served the way you like it!
The largest advantage is the ability to pre-plan upcoming vacation trips, business trips, delivery routes, etc., save those routes, and activate them at your convenience.
Many blog readers are stating that this is their main reason for unlocking, not for the desktop access of other programs.
New Skins

CD’s Quicksilver ’66 for C230 Skin is included in this package. It includes my fix resolving the proper announcements at roundabout intersections. You’ll also find details on his nice personal refinements to his Unlock screens, as shown in photo above, here.
Check out the GTO car icon that he designed himself!
New Games ![Wink [;)]](https://i0.wp.com/www.gpspassion.com/forumsen/icon_smile_wink.gif)
Aquelaball is a JezzBall-like game for PocketPC.
Just draw a line with the stylus to have a vertical or horizontal line spread across the whole screen. If a ball touches the line while it is being drawn, it will be cancelled and you&ecute;ll loose alife.
Cover over 75% of the screen and make it to the next level, with 1 more ball.
 Test out your reflexes and Stylus control with BallBreaker !All the balls are shooting strait at you, and you just can’t touch them… The only solution is to explode them against the grey squares…The more balls you break, the more you’ll have coming at you.
 Caisses is a Sokoban clone that includes 500 levels and 14 different backgrounds and themes. The original version of Caisses is Caisses DS, a Nintendo DS homebrew coded by Kukulcan.In this game, you are a warehouse keeper, and your mission consists in arranging boxes by pushing them onto their designated locations…Boxes can be pushed, but not pulled, and the controls are simple : either point to the spot to move to with the stylus, or use the directional pad !
 Pipes is a classic in the puzzle world.Select one of the 6 difficulty levels (actually 12 as for each you can activate wrap mode, making it MUCH harder…) and try to light up all the flowers…Turn the pipes by clicking on them, and try to bring water throughout the whole board in as little time as possible.
 Skinz Sudoku is a Sudoku game which combines good looks and ease of use…It offers beautiful graphs by Daydream, with 4 different skins depending on the difficulty level.
The game’s particularity is that it offers 4 different input methods for you to select from, to fit everyone’s needs…
– Wheel : Select a number from the number wheel around the tile you touched. You can also set a hint by touching one of the corners…
– Square : Same thing, but in a simplier/more compact layout…
– Bar : Select first which number to plot, and then touch the grid to put it anywhere…
– Writing : In this mode, touch a tile to have it zoom, and just write down the number you want ! You can also add small number hints at anytime, with every input method, using the top right button, or undo if you make an error…All the levels are randomly generated, so don’t expect to finish the game soon
Additional Games are available here.
Route Management
Someday, there could well be built-in MioMap screens for Route Management (I’m available, Mio) either in alternative skins or adopted by iGo or Mio in an update, to do these same functions using the logic strategy contained in my menus (with thanks to Xania for the initial work), but for now the menus seem like an excellent alternative, especially now that the Exit button functions so nicely.
With the Route Management menu, you can not only preplan your routes, but by
Use the GPS power button now available in the enhanced skins to temporarily turn off the GPS chip, so that when pre-planning routes not having anything to do with your present location, the Route recalculation will not mess you up your itinerary.
The Ameridan skin (included) for the C230 includes all of the tweaks mentioned in this blog including:
-
Exit Door button needed if you are unlocking your C230.
-
Revised start screen identifying the source of the modified file.
-
Export Track button allowing you to export the track log into a gpx file directly.
-
Easy Route option described
here.
-
GPS Screen with the globe rotated such that North America is proudly shownand the GPS Power button needed for uninterrupted general map viewing and Route preplanning without Auto Route Recalculation kicking in.
Starting with Version 3.3, the menu script creates automatic entries to the SYS.TXT file needed for this menu to function. You no longer need to run through the setup process prior to using the menu.
I’ve gone through a lot of coffee again on this release ( the best one yet! ) and if you are pleased with the results and haven’t already done so, kindly consider a small donation to my coffee fund.

click
Other ongoing projects:
1) Investigating how to delete individual items in the Route History list which is part of the SQLite 3.0 database file iGo.db, since right now it’s Clear All or nothing. DONE
2) Investigating how to put a Restore CE Core package together, so that we can atleast run .cab files again or install programs via ActiveSync. CAB INSTALLER PORTION DONE
3) Investigating how to raise the volume of Samantha’s TTS speech, per requests. DONE
Oh, and don’t forget to check out my Mio-C230 StickiNotes in the right column where blog items and other tidbits readers provide will be easy to find.
Unlock Version NXT-R3.5
[BEFORE YOU FOLLOW THE PROCEDURES TO MODIFY YOUR MIO C230, KNOW THAT YOU MIGHT RENDER YOUR C230 UNUSABLE AND YOU MIGHT VOID YOUR WARRANTY. YOU DO THIS AT YOUR OWN RISK.]
Installation procedure
- Turn on C230 and connect it to the computer using a 5-pin Mini-B USB 2.0 cable (not included in the package).
- C230 will show up as a flash drive in My Computer as Mio Device. Mine is assigned as F drive. I’ll use F drive in the following steps. Substitute it with the actual drive letter of your system. If you have a SD card in the slot, it shows up as well – in my case as G drive.
- Rename the folder F:\MioMap\MioMap to F:\MioMap\MioMap2.
- In order not to get the message ”destination full”, you may need to free up some space on your flash disk. See Note3.
- Download MioC230_NXT_R3_5.zip
- USA MioC230 users – The enhanced C230 skin is included in the download. Owners of the European C230, please review this page and Note 4, before Unlocking for information on using this Unlock on your units. You can modify the file yourself – See Note 4.
- Extract the files from your Unlock download and find the four folders MioMap, Script, Skins and Games.
- Copy MioMap to F:\MioMap\ and copy Script to F:\ as in the screenshot. Don’t speed through this step – it’s got to be done as described!

- Copy the Skins and Games folders to the root of your SD card and make a backup copy of the original data.zip file to your PC or Storage Card.
- If you would rather use the “iPhone-look” icons without the English sub-text, then replace the icons in \My Flash Disk\Script\Icons with the alternate icons available here and in the comments for the Version 3.4 Blog.
- Disconnect Mio C230 and do a hard reset by sliding the switch on the rear of your C230 to OFF and back to ON again.
- After calibrating the touch screen, the initial Unlock script will automatically run AUTOPATCHER (no menu selection necessary), soft reset and present you with a desktop screen. It is important that you select a skin that has an Exit button before launching MioMap, so go into the MioMap Management Menu (first large icon in top left corner) and choose an enhanced MioMap skin (Ameridan C230 is suggested initially), unless you are manually modifying DATA.ZIP per Note4 below because you are unlocking a MioC230 that isn’t the USA or Canada version.
Note 1: If you wish to undo the enhancements and return the Mio C230 back to factory condition:
- Turn on C230 and connect it to the computer using a USB cable.
- Rename the folder F:\MioMap\MioMap to F:\MioMap\MioMap3 (or delete) and rename the folder F:\MioMap\MioMap2 to F:\MioMap\MioMap
- Copy back any map files you may have deleted or moved to your SD card and restore your DATA.ZIP file. The SYS.TXT file shouldn’t need to be restored.
- Disconnect the cable and hard reset C230 using the switch on the back of the unit.
Note 2: Remember, every time you disconnect the USB cable linked to your PC, you will need to do atleast a soft reset, although in some cases you really should do a hard reset. The time and date will need to be reset after a hard reset, unless you are going right into MioMap with Time Autosync enabled. This is why you might consider using a SD card in conjunction with a USB card reader for adding programs and storing media files once you’re happy with your unlocked Mio setup.
Note 3: In order not to get the message “destination full”, you’ll need to free up some space on your flash disk by moving at-least 12MB of map files to your SD card by creating a MioMap folder and within that folder a maps folder so that the path appears as G:\MioMap\maps. Choose a combination of map file(s) you’re not accessing every day (in case your SD card isn’t always inserted) from F:\MioMap\MioMap2\maps and move them to the maps folder on your SD card. MioMap will see them after a hard reset as if nothing happened. Or you could delete them (or copy to your PC) if you choose not to use a SD card at this time, since it’s easy to explore your MioMap DVD and copy them back to the original folder or a SD card later, if needed.
Note 4: Instructions to modify your DATA.ZIP file yourself (from Amida’s Hack #2).
[Not normally applicable for US and Canada units any longer, because Skins Management will allow you to choose Skins that already incorporate the needed revisions]
- Make a backup of your original DATA.ZIP file. The file is F:\MioMap\MioMap2\DATA.ZIP .
- Unzip the original DATA.ZIP to your local hard drive.
- Edit the file mio\common\ui\default_setup.ui in the uncompressed files.
- Find the following line and delete it. Note that this is for C230 only. You might need to edit/delete other line for other models.
runif vDeviceType “MIOC230″ ‘btn_exit_app.hide’
- Compress the files back into DATA.ZIP again.
- Copy the DATA.ZIP from step 6 to the F:\MioMap\MioMap2\ directory.
- If you get a ctype.dat error as has happened with some users, either try again or download the file instead. When it comes to zipping the file back up, it has been learned that WinZip version 11 (10 is OK though) is not compatible with MioMap. I use WinRAR and I choose “best” compression but I’m not sure if that really matters.
Version 3.5 User’s Manual: Using your unlocked C230
Default Screens
Any one of these can become your default screen simply by making your choice in the Screen Choice Menu.
Screen Choices Menu
If you scroll down in the Route Management menu selections, you’ll see the option for Screen Choices that is brand new in Version 3.4
-
Would you like to make any changes to the desktop or clock Screens? This gives you a chance to get out without going through the other questions.
-
Would you like a desktop screen to be the default screen? No makes a clock screen the primary screen after a reset instead.
-
Would you like to swap clock screens? Your preference – the green one or the orange one.
-
Would you like to swap desktop screen themes? Your preference – the green theme or the “iPhone-look” theme are applied to the primary desktop screen, the Games screen and the Extra Tools screen simultaneously.
Clock Screens
You’ll note that the MioMap icon and the Next Screen icons are dimmed in the Clock screens, so that the initial screen might serve as a simple, unclutterd clock screen in your RV or automobile.
-
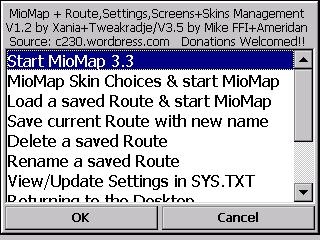
The MioMap icon will take you directly to my new menu with options to either proceed into the MioMap program, Save / Delete / Rename / Load routes, View / Update MioMap settings in SYS.TXT, view a brief Help screen on Exiting MioMap, quickly be able to turn off the taskbar before running MioMap and of course make your screen choices.
-
The Next Screen arrow icon will take you to your chosen desktop screen.
-
You can return to the Clock screens by clicking on the Clock icon.
-
From the desktop screens, you can proceed to other screens you may have designed, or to the Games or Extra Tools screens, which are included only in this unlock package.
Games
Eight (8) games are included in this package. I’ve written MortScript scripts for each of the games that run in portrait mode that will do so automatically and will return your unit to landscape mode when exiting the game. If you want to downsize the package or if you know you won’t want any or all of the games, simply skip copying the Games folder to the root of your SD card. and you will be left with only Solitaire and LitesOn.
Route Management
^ From either the clock screen or the desktop screen, click on the MioMap icon (the GPS icon in the upper left)
Prior to unlocking your Mio GPS, you would be unable to save multiple routes and the default route.dat file normally saved in \My Documents\MioMap folder would be erased during a hard reset, making the Route Management menu feature a substantial add-on to your Mio C230!
Normally you don’t need to save a route on your Mio, since you can just create a POI for the destination and regenerate the route dynamically when you want to go there. If you want to see where you actually drove along the way, you can record a track log. However, there could be times when you have created a more complex route with multiple waypoints, and you want to save it. This could be because:
- you’ve imported the route as a set of waypoints from an online route planning site, and you don’t want to lose the effort of setting it up on the Mio
- vacation pre-planning – you’ve set up a complex route for a vacation trip that doesn’t start from “home” and you want to load it into memory once you’ve arrived at the start point
- you want to share your route with another Mio user.
NOTE: When planning routes that start from a location different from your present location (Vacation pre-planning), the Off-Route Recalculation option has a habit of interfering. You have a few options here:
-
The first leg of your trip can be from your present location to the intended starting point. Just keep setting your route up and when you’re finished, remove the first Waypoint (using the second button on the bottom of the Edit Route screen) which deletes that first segment of the Route. It seems that once you’re in the Edit Route screens /Fit to screen/ etc., that the GPS doesn’t recalculate from your present position. It’s when you are in Map or Cockpit where that happens. With the Route Management Menu, you just exit and Save your Route for future viewing or navigating.
-
The bottom selection on the General Settings page is Off-Route Recalculation. Switch this from Automatic to Disabled. This doesn’t actually turn off the GPS receiver, but it keeps the C230 from messing up your Route planning. Just don’t forget to switch it back to Automatic when your done with your Route planning.
-
If using an enhanced skin offering the GPS power button, turn the GPS chip off with this button and you will not experience any off-route calculation interference.
Sample pre-loaded route to view
^ click on “Load a Saved Route…” and select this sample file and it should copy itself as route.dat and open up in MioMap. To visualize this Route, select Cockpit > Menu > Routes icon (third in bottom row) > Info > Fit to screen. When you edit or delete route from within MioMap, you are impacting route.dat file, not the saved file you selected from the menu, so if you want to save changes you’ve made, you’ll have to do so after you exit MioMap and return to the Route Management menu.
Creating Routes
-
We’ll make an example up > Go to History or Address and select a destination, Mio will create a route, click in the area of the 3 green rectangles, Select Fit to Screen to see route. Your route has already been autosaved as route.dat.
-
Now we’re going to save it with another name so it doesn’t get erased > Menu, Home, Exit, go to Route Management Menu, select Save, select a Name and you’re done.
-
If we go back into MioMap, it always resumes with the route.dat file (if it exists) so if you wan’t to work on a different saved route, you need to load it into memory using that option in the Route Management menu.
-
If you create a new route in MioMap now, that route replaces route.dat with this new information, but since you’ve saved the former route with another name, you can just load that saved route in to replace route.dat again.
Settings Management
Map Font Size
The first option involves the font size of the map text (street and city names) that by default is 100; I believe this means 100%, rather than actual font size, since the text size varies with the zoom level. I’ve come up with two larger sizes to help the visually challenged (either because of eyesight or non-ideal conditions in the placement of your GPS unit – like on a motorcycle). LARGE which is 130 (30% larger) and XLARGE which is 150 (50% larger). Realize that the there is a downside to the large fonts. If the road is short or the name is real long, the name may not fit and may not show until you zoom in further. Also, the map may take on a cluttered look in a city where the streets are in close proximity to each other. That is where the menu option to change the font size on the fly comes in real handy.
If you find that you would like LARGE and XLARGE values to differ from what I have chosen, adjust the numbers in the script to suit your needs.
City Names in the Navigation bar
By default, if your route goes through several settlements, MioMap displays the next city name instead of the name on the top of the cockpit screen until you get closer to the next maneuver. I usually do not care about the next city name – what I would like to see is the upcoming street name whenever I look at it. Especially since on US maps there are so many little “settlements” nobody even knows that they exist…
The second option addresses the complaint quoted above by giving you the option of suppressing the Cockpit display of upcoming city and community names in the Navigation bar. The factory setting is annoying to may users in that they don’t want to see the names of the upcoming cities in the Navigation bar; they can see those on the map itself. They simply want the next street name requiring their attention to appear in the Navigation bar, even if it is many miles away.
This setting can be changed on the fly as well, but I find myself keeping the setting set to Suppress all of the time.
Flyover settings
iGo calls the two flyover modes: Lifelike simulation mode which runs real-time (at speed-limit rate) and includes voice instructions – mainly used by retail stores with looping turned ON as DEMO mode, and for the user to become familiar with it’s routing functioning. Fast-flyover mode runs 10 times faster (10X the speed-limit rate) and voice instructions are not played in this mode, but I find that it is much more useful for reviewing a planned route.

^ your choice. Mio’s default is YES (demo mode), but I prefer NO.

^ the script reads your current SLOWSIM value (slow simulation – which is the inverse of fast flyover) entry in the file and allows you to keep the value (YES) or change it (NO). For fast flyover, slowsim=1 is changed to slowsim=0.
NOTE: Accelerated Flyover should be set to OFF, if you are using enhanced skins that also give you Flyover options while in the Route screens, so as to not reverse the expected behavior when chosing your options from within MioMap.
One-Way streets

^ the script reads your current entry in the file and allows you to keep the value (YES) or change it (NO).
This is another option that is nice to be able to change on the fly. When turned ON, you will see pale blue arrows indicating the flow of traffic on One-Way streets. You will also see red icons indicating roads that you are not allowed to drive on, such as golf cart only and private roads.
Desktop Theme Management
When selecting themes now, you set the background and icon selections for not only the main desktop screen, but the Extra Tools and Games screens as well. The choices currently offered are the Green Theme and the iPhone-look theme. You can change the whole look by simply chosing your own background image and substituting it in place of the back.bmp or back_black.bmp files in the Script folder.
Skins Management
You can add as many additional skins as you want by creating folders within the Skins folder that’s on your SD card. As an example, if you want to add Riks skin, create a folder ‘Riks for C230’, and then copy the respective DATA.ZIP as-is into that folder – not into the MioMap2 folder as you do for singular skin changes.
Green Theme

You’ll note that the MioMap icon and the Media Player are larger than the rest. My reasoning for this is that they will probably be your favorites and you are likely to access these without a stylus. The other icons…
- MioTool– hitting the small “ab” box in the top left corner with your stylus will reveal a virtual keyboard for entering data. To turn the keyboard off again, just hit the icon again. Another method of engaging the keyboard is hitting the keyboard icon on the taskbar (2nd from the right).
- MioMap– Starts my new menu with options to either proceed into the MioMap program, Save / Delete / Rename / Load routes, View / Update MioMap settings in SYS.TXT, view a brief Help screen on Exiting MioMap, and quickly be able to turn off the taskbar before running MioMap. Exitand Cancel both take you back to the desktop screen. You can either select your option and hit OK, or simply double-click your option.
- TCPMP Media Player – Core Pocket Media Playeris loaded with features and options that aren’t realized until you click Options\Settings\Select Page and explore around. The current version in this build is TCPMP version 0.72RC1 with all of the available extra drivers and it will play manyaudio and video formats, as well as photo files and flash videos. By running the program once, you will associate all of the supported file types, so that you will then be able to click on a .wav file, as an example, in File Manager and play the file.

Shortcuts 2nd row-from-bottom across:
- Clock – proceeds to your chosen Clock screen for that uncluttered look.
- Windows Explorer – my primary reason for using this shortcut is to fix file icon associations in File Manager and to resolve the Show Toolbar performance.It should be noted that the first time you select Windows Explorer, you are likely to get the Mio orange screen with a minimized taskbar at the bottom. You just need to use your stylus in the right corner of the hidden taskbar (the narrow gray stripe at the bottom edge – this is why it is important to carefully calibrate your screen with a stylus!) and choose Desktop (don’t click on MainShell). At this point, the taskbar and Windows Explorer will behave better, and the icon associations in File Explorer will work, and other programs that seem to be missing menus, like exit, folder selection, etc. will display their own taskbar (see the Freecell screenshot).
- Pocket Notepad– viewing txt files and for creating quick txt files with the virtual keyboard. Comes in handy for quick editing ini, mscr and other text files.
- Volume Control – graphic volume control display
- Games screen – <described above> proceeds to the Games screen, dedicated to the included Game programs (some of them provided by Blog readers) so that you can have some fun too. A stylus is recommended for most of them though (not a pen).

- An empty spot for a shortcut of your own (plus room for another 8 shortcuts above this row and as many more pages full of icons as you wish) *
- GQ Photo Viewer– GQ is easier to use for viewing multiple photos than media player, and it has a zoom function
- Restart – soft reset button
Shortcuts 1st row-from-bottom across:
- MioUtility– quick access to adjust Backlight, Volume, Screen calibrate, Power, Date/Time and Language. This is the program that older units like the Mio C220 used to exit from MioMap into, but MioMap 3.3 has been written such that these choices are all available from within the program now and in fact the Volume Control appears to be non-functional. You’ll find that setting the date and time is much easier by clicking on the clock on the toolbar, unless you like the 24-hour format.

- Taskbar toggle –toggles the taskbar on and off in whatever state it is in (hidden or revealed) The taskbar area of the green desktop screen is also programmed to trigger this function.
- FileManCE2 – Two-pane File Manager application alternative to Windows Explorer.
- Extra Tools Screen –<described below> an animated slide to another Desktop screen with additional tool programs that may not be used as frequently. This will serve as an example for you to come up with alternative screens if you install many other programs onto your Mio C230 and wish to group them onto their own screens.
- WR-Tooks ResInfo –Quick access to status info on battery, program memory, storage memory, Flash Disk useage, Storage Card useage, tasks and processes currently running, system information and settings. Most of this information is also available from Control Panel as well.

- My Calculator – a scientific calculator that is large enough to use without a stylus. To exit, click on the About tab, then on the X on the right side
- CapScrUtil– a screen capture utility. Remember to store the .bmp images to either Storage Card or My Flash Disk for easy access to the screenshots. (This utility was used to create all of the images in this blog page)
“iPhone-look” Theme
I changed the solid-black background to a dark brushed metal background for this release ↓


Program icons starting with the top row (small icons):
Program icons starting with the top row of large icons:
-
MioMap– Starts my new menu with options to either proceed into the MioMap program, Save / Delete / Rename / Load routes, View / Update MioMap settings in SYS.TXT, view a brief Help screen on Exiting MioMap, and quickly be able to turn off the taskbar before running MioMap. Exitand Cancel both take you back to the desktop screen. You can either select your option and hit OK, or simply double-click your option.
- TCPMP Media Player – Core Pocket Media Playeris loaded with features and options that aren’t realized until you click Options\Settings\Select Page and explore around. The current version in this build is TCPMP version 0.72RC1 with all of the available extra drivers and it will play manyaudio and video formats, as well as photo files and flash videos. By running the program once, you will associate all of the supported file types, so that you will then be able to click on a .wav file, as an example, in File Manager and play the file.
-
GQ Photo Viewer– GQ is easier to use for viewing multiple photos than media player, and it has a zoom function
-
FileManCE2 – Two-pane File Manager application alternative to Windows Explorer.
-
DPMS– puts your screen to sleep while everything else continues to run. This could save battery consumption while recording GPS track logs or playing an audio book, etc. Apparently, if you leave the icon in it’s present location, it also seems to toggle the screen back on when you tap it with the screen dark. This is a quirky program / icon sometimes, so if relocate it and it behaves badly, you’ve been forewarned.
Program icons starting with the 2nd row of large icons:
-
Clock – proceeds to your chosen Clock screen for that uncluttered look.
-
My Calculator – a scientific calculator that is large enough to use without a stylus. To exit, click on the About tab, then on the X on the right side.
-
Games screen – <described above> proceeds to the Games screen, dedicated to the included Game programs (some of them provided by Blog readers) so that you can have some fun too. A stylus is recommended for most of them though (not a pen).
Pocket Notepad– viewing txt files and for creating quick txt files with the virtual keyboard. Comes in handy for quick editing ini, mscr and other text files.
Pocket Paint
Program icons starting with the 3rd row of large icons:
-
Restart – soft reset button
-
MioUtility– quick access to adjust Backlight, Volume, Screen calibrate, Power, Date/Time and Language. This is the program that older units like the Mio C220 used to exit from MioMap into, but MioMap 3.3 has been written such that these choices are all available from within the program now and in fact the Volume Control appears to be non-functional. You’ll find that setting the date and time is much easier by clicking on the clock on the toolbar, unless you like the 24-hour format.
-
WR-Tooks ResInfo –Quick access to status info on battery, program memory, storage memory, Flash Disk useage, Storage Card useage, tasks and processes currently running, system information and settings. Most of this information is also available from Control Panel as well.
-
CapScrUtil– a screen capture utility. Remember to store the .bmp images to either Storage Card or My Flash Disk for easy access to the screenshots. (This utility was used to create all of the images in this blog page)
-
Windows Explorer – my primary reason for using this shortcut is to fix file icon associations in File Manager and to resolve the Show Toolbar performance.It should be noted that the first time you select Windows Explorer, you are likely to get the Mio orange screen with a minimized taskbar at the bottom. You just need to use your stylus in the right corner of the hidden taskbar (the narrow gray stripe at the bottom edge – this is why it is important to carefully calibrate your screen with a stylus!) and choose Desktop (don’t click on MainShell). At this point, the taskbar and Windows Explorer will behave better, and the icon associations in File Explorer will work, and other programs that seem to be missing menus, like exit, folder selection, etc. will display their own taskbar (see the Freecell screenshot).
Extra Tools
Taskbar
The registry tweaks introduced with version 3.1 should help tame the taskbar performance. The default setting for “Always on Top” has been deactivated. Try to remember to toggle the taskbar OFF prior to using MioMap though. Want the day and date? Press and hold the clock on the screen. Want to minimize the taskbar? Start/Settings/Taskbar Properties/OK.
Adding your own programs and icons
Add any additional programs (.exe files, not .cab files) you’re interested in to the script folder, try them (try them means not only do they seem to work, but that they don’t cause any issues with the other programs, especially after a hard reset), and if you decide to keep them and want a desktop shortcut to them, add your own icon (.ico file) to the script folder and add the data to main.ini, also in the script folder.
* Any “empty” icon(s) on the desktop screen are in fact not empty, but the icons are “dimmed” to zero (actually 1). Otherwise the go.ico would show with no program associated with it and people would complain about the error message and ask why the icon doesn’t work. I doubt that you’ll find this documented anywhere else on the web – but just change the ScaleAlpha parameter to 100, and wala, the icon will shine thru at full “brightness”. That is how I “dimmed” the two icons on the default clock desktop screen – I set the ScaleAlpha to 25. You could dim those icons to 1 if you wanted to hide them completely, but they would still function.
ICONXPBUTTON
X = 121
Y = 175
Command = \My Flash Disk\Script\(your program.exe)
SizeNormal = 32
SizePushed = 32
ScaleAlpha = 1 (change to 100)
IconNormal = \My Flash Disk\Script\(your icon file name).ico
ScaleAlpha = 100
IconPushed = \My Flash Disk\Script\go.ico
For an english translation of the online manual to learn more about SystemInformation that controls all of the desktop screens.
Registry tweaks that are included
- The 2007 changes for DST work correctly now for the EST time zone*
- The default time zone is GMT-5 (EST)*
- Key clicks and screen tap sounds are enabled
- Volume level in Windows CE, which is independent of the volume settings within MioMap, is cranked up
- File Manager font is Tahoma 7, which works much better on the 3.5″ screen
- The default folder for GQ Viewer media is \Storage Card
- The default ALWAYS ON TOP behavior for the taskbar is disabled, although the setting seems to sneak back in once in awhile
- The automatic tutorial during startup of the Calculator is disabled
* Added instructions in the script file so that using my code as an example, you can adapt the script to a time zone other than EST.
To return to the desktop screens or the Route Management Menu from within MioMap, simply click on the Exit Door.

ENJOY!!


 Bringing the most recent Unlock & MioMap Menu packages back to the front of the line in my Blog…


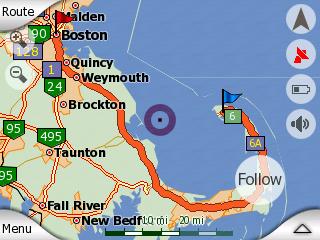
 What I have in mind for a geocache / straight-line navigation screen…


